
Building Your Own Duck Boat
By Jeff Ludeke | PUBLISHED June 11th, 2023
There's a common saying that boat stands for Bust Out Another Thousand (B.O.A.T.). Knowing that boats can become money pits is one of the main reasons some hunters prefer to head out to their local walk-in area or hitch a ride on a buddy’s boat instead. But what if I told you that you could build yourself a nice duck boat for under $5,000, and be able to access your local marsh or river?
With private land access becoming increasingly hard to come by, getting yourself out onto the water can greatly increase your hunting opportunities. Here in the state of Wisconsin, all navigable water is public. Article IX of the Wisconsin Constitution states that navigable waters are “common highways and forever free." If you can access an area legally and keep your feet wet (or boat), you are good to go.
I've built several of my own duck boats, and even went into detail recently on the UPDUCK podcast, about how I built my own duck hunting boat. My duck boat journey has been a great learning experience on many fronts. When I bought my first Jon boat in high school, I had no idea what I was doing. I learned by making mistakes and evolving my design through many years of duck hunting. If you are reading this blog and are interested in building your first duck boat, I hope this information will help make your journey a little less intimidating, and potentially save you a few dollars.
I bought my first boat when I was 17 years old. 19 years later, I just finished building my 3rd duck boat. My latest boat is a 1436 G3 flat bottom boat. For Jon boats, 1436 means that the boat is 14 feet long and 36 inches wide at the bottom. I settled on a 1436 after considering the types of waters I wanted to navigate, the types of launches in my area, and the number of hunters/dogs I wanted to hunt with. There are many boat configurations to choose from, the important part is analyzing what areas you want to hunt, and then choose a size that best fits those spots. For me, I mostly hunt small rivers with boat “launches” that are usually comprised of dirt paths off the side of a bridge or road. Because of this, keeping my boat small and light was a requirement. In some situations, I have to pull my boat off the trailer onto the ground, and then drag it into the water. Doing this with anything bigger than a 1436 would not be feasible, especially if I'm hunting solo.
I bought my boat off Facebook marketplace in summer of 2022. I drove down to the Land of Lincoln with cash in my pocket, and picked up an old fishing boat that was, coincidentally, used primarily at a cabin in northern Wisconsin. The hull was in good shape overall, but needed a fresh coat of paint. The trailer looked to be in good shape, but you'll never know for sure until you start diving into your build.
Purchase the boat and bring it home:
Materials: - Cash (Bank - $1200)

After I got the boat home, the first thing I did was pull the hull off the trailer for a thorough inspection of what I had just bought. Upon doing so, one of the trailer bunks snapped off and sent the boat toppling into the yard.
Fix the bunks and install new trailer lights:
Materials:

After the trailer was in better shape, it was time to start diving into the hull. I was fortunate enough to find a boat that still had factory paint, and was only used for fishing - us duck hunters tend to beat up our boats. However, the interior of the boat was scratched up and the paint worn off. I liked the factory color of the boat, and wanted to re-paint the interior. After getting a crazy expensive quote from G3 for spray cans, I decided to head to my local hardware store and see what they had. I pulled off a handle from the boat and had it color matched at the store. I decided to try an ultra-flat Behr outdoor paint. Because my household is currently run by my two young children, I opted to save time and not strip the existing paint. I knew it wouldn’t last as long, but let’s be honest, I’ll just throw another coat on top once it wears off.
Paint the hull:
Materials:

After a few coats of paint, the boat was looking brand new again. It’s amazing how much a fresh coat of paint can take any old Jon boat and bring it back to life. As I mentioned above, my boat builds have evolved through the years, and I try and make upgrades along the way. For this build, I decided to try out Hydro-Turf. After talking with friends and fellow duck hunters, the Hydro-Turf seemed like a great way to make the boat safer, make the boat quieter, save the paint job, and overall make the boat look a little more badass. By no means is Hydro-Turf necessary, but it does have a lot of benefits.
Install Hydro-Turf:
Materials:

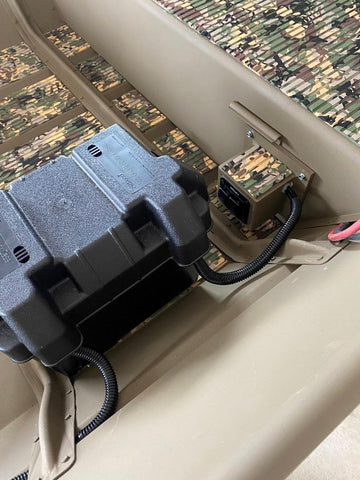
With the Hydro-Turf installed, it was time to start electrical. Electrical is one of the most time-consuming parts of a boat build. It is very important to have a plan a head of time and know what types of lights, how many lights, and the location of said lights. With a small boat like mine, I didn’t have a need for anything besides lights and a way to start the motor. I wanted a light bar up front, a few interior lights, and navigation lights. I wired everything up to a 2-gang switch panel to run the interior and navigation lights separate from the light bar. This was important in the event you are passing someone in the dark. Some tips for electrical:
- Run a bead of silicon caulk between the housing and the clear cover on your light bar. This will help it stay water-tight.
- Use quick-connects for your wiring to save you time in the winter when you want to remove all of your lighting.
- Research the wiring on your switch-panel in order to eliminate the permanent light that stays on even when you’re not using the lights.
Install electrical:
Materials:


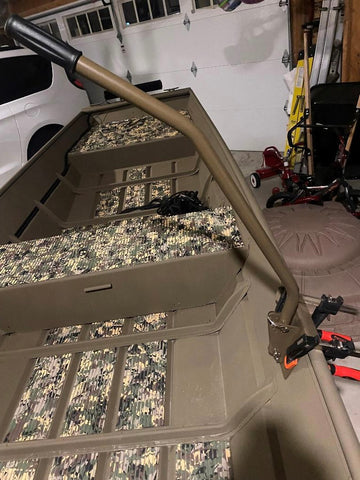
The blind is a piece of the project that I went back and forth with. Because my boat is smaller, I wasn’t sure if it was worth constructing another home-made blind. On my previous boats, the blind did not function very effectively, and sometimes ended up being more of a hassle than it was worth. In some situations, you can either stand/sit in shallow water with a marsh stool or find an area that has some surrounding public land to sit on. Despite my best efforts to pass on building a blind, I decided to put another one together. In the end, I’m glad I did. On my last two boats, I’ve had success using Bimini top brackets and caps to construct a basic scissor-style blind. If you have ever been on a pontoon boat with a canopy, the framework is exactly like most boat blinds. The Bimini hardware easily attaches to electrical conduit, swivels to either side of the boat, and is easily removed from storage or transportation. Throw on some camo, and you’re ready to go.
Build the blind:
Materials:


Now for the main course, the motor. My previous boat had a Swamp Runner longtail kit paired with a small 212cc predator motor. This set-up was a great starter kit, and got me where I needed to go. However, after buying a 2-foot longer boat, I knew I would need more horsepower. Captaining a “Thai” longtail kit is like steering the Titanic. Because of this, I decided to purchase a Backwater Inc. longtail kit. I headed over to my nearest Harbor Freight and picked up a new 459cc Predator motor. The Backwater kit is all American made, and it shows. This set-up was a huge upgrade from my Thai kit and pushes my 1436 at about 20MPH.
Install the motor and longtail kit:
Materials:

Installing a grab bar was a minor upgrade to the boat, but one that required me to get creative. My previous boat had a grab-bar comprised of electrical conduit that was mounted behind the middle seat. My new boat is longer and did not allow me to swap it over. I decided I wanted a grab bar that swiveled down and out of the way for storage, so I purchased a grab bar directly from Backwater Inc. After I mocked up the mounting bracket on the side of the boat, I quickly learned that the sides did not have enough rigidity to support my weight hanging on the handle. I was determined to make the grab bar work, so I found a few pieces of aluminum angle iron, tied it into the ribs on the sidewall, and then celebrated with a beer. The build was complete!
Grab Bar:
Materials:

Time to hunt:
Materials:

Overall, I’m very pleased with how this build turned out. I was able to use the boat quite a few times this part waterfowl season, and never had any major issues (aside from sand eating my prop). If you decide to go down the duck boat build road, I hope you've learned a thing or two from my build.
Cheers!
Jeff
0 comments